
Building Huge Carriage Style Doors
On the rear of our barn, I left an 8×8 hole to provide rear access. At the time, I wasn’t sure whether I wanted to put an overhead door there, or something else. Ironically, that access has been blocked by a false wall I put in that provided no access at all. Over the course of a year or so, I decided a set of carriage doors would be awesome. I did a ton of research around how they could be built while still fitting in my limited budget. I must have gone through a dozen different sets of plans; sketching, drafting in Illustrator, building them in Sketchup.
I though something insulated would be nice, with a wood frame that housed foam, then sheathed with 1/4 ply with details added on the outside. I was worried about the 1/4″ ply holding up to the weather and all the layers got to be too thick.
I ended up choosing to build solid doors using mortise and tenon joinery. I priced it out using several different materials. PVC would have been awesome – light and resistant to the elements. It was super expensive. I looked at several different wood species and would have loved to get doug fir, but coming across it on this side of the country turned out to be hard. In the end, I went with pine, as it’s relatively light and inexpensive, with the understanding it won’t last as long as hardwood.
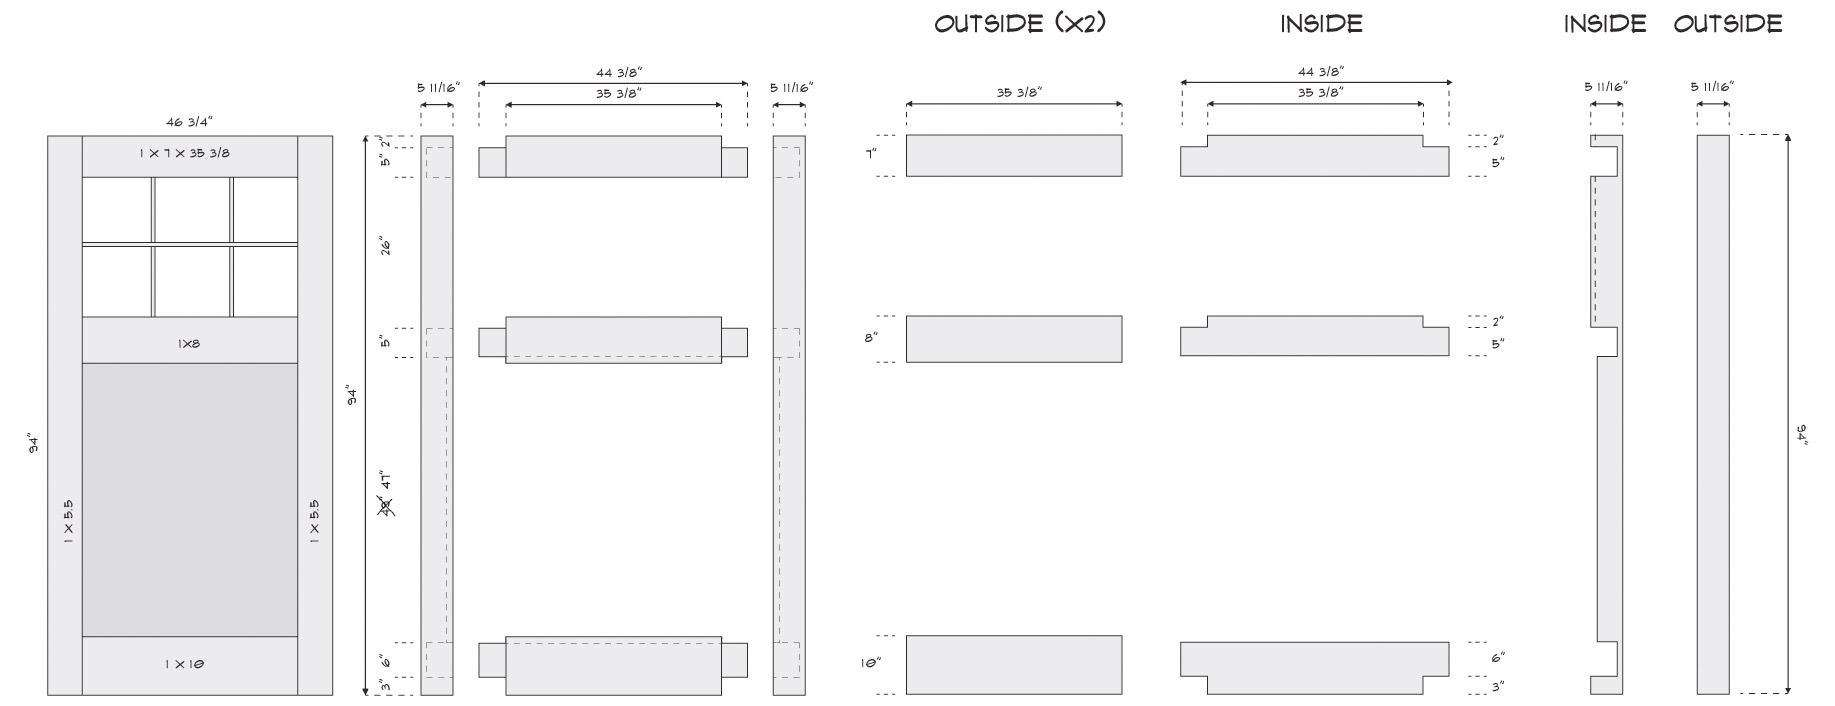
Here is the plan. I used three layers of 4/4″ 1″ nominal, 3/4″ actual pine. This allows me to get a 2.25″ thickness before sanding and affords the ability to cut the mortises and tenons out of the middle layer before gluing up. This proved to be a good idea, as I didn’t have the tooling to cut mortises this large or deep. The center will be pine carsiding.
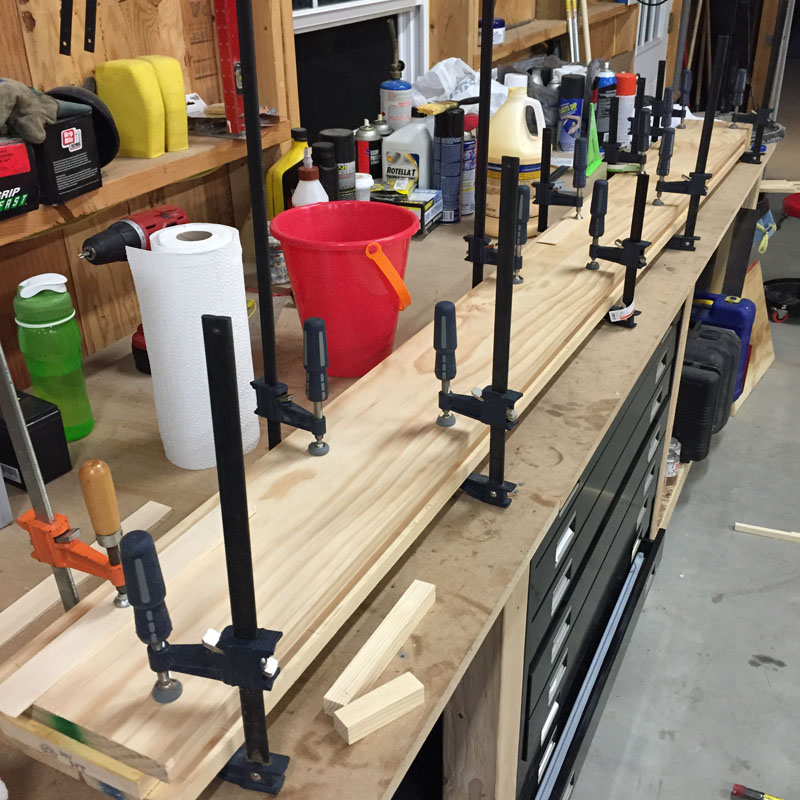
In the name of stability, I laminated 3 layers of 4/4 pine. Here is one of the stiles in clamps. Never enough clamps…
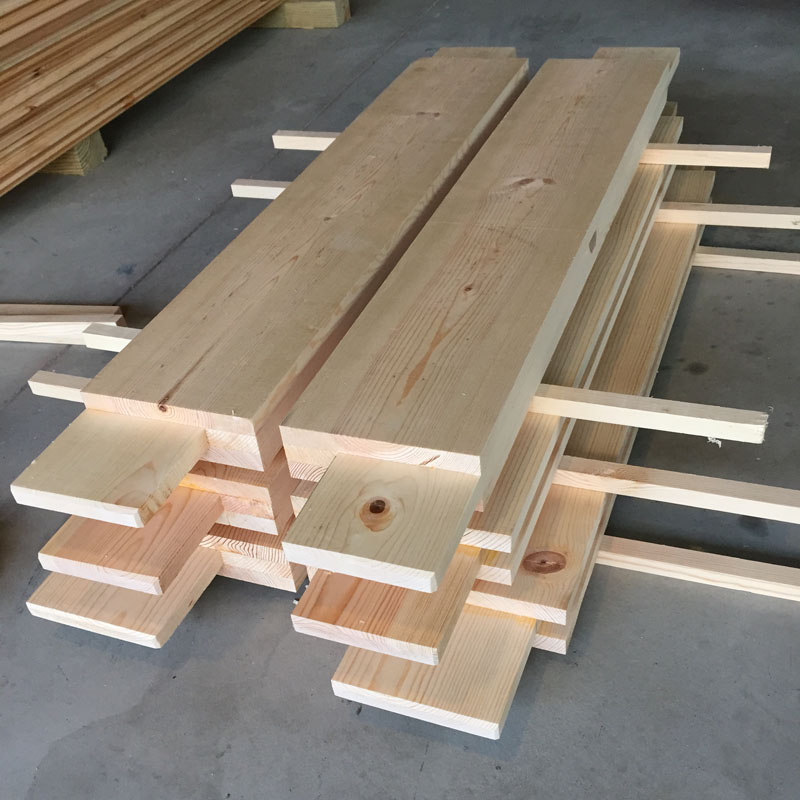
And here are the rails all done.
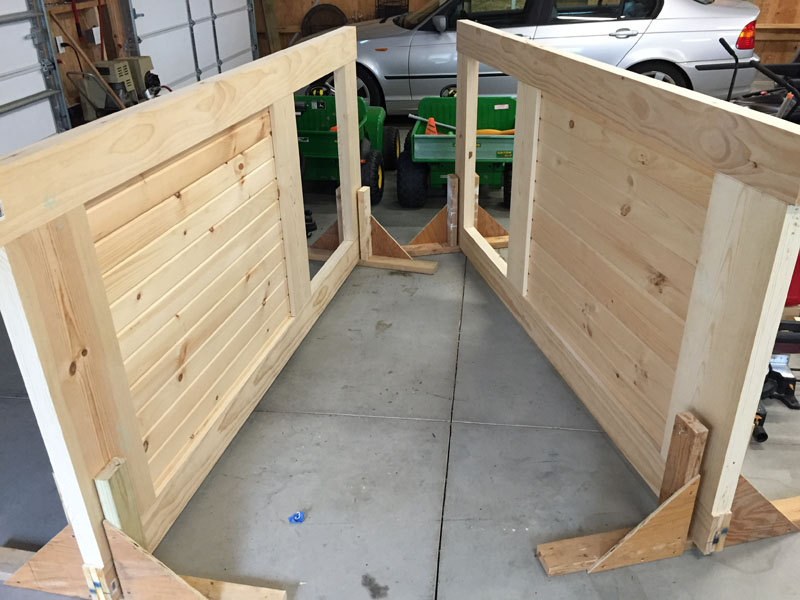
Here we’re mocking up one door before glue up. Some minor adjustments were needed to get everything to fit just right.
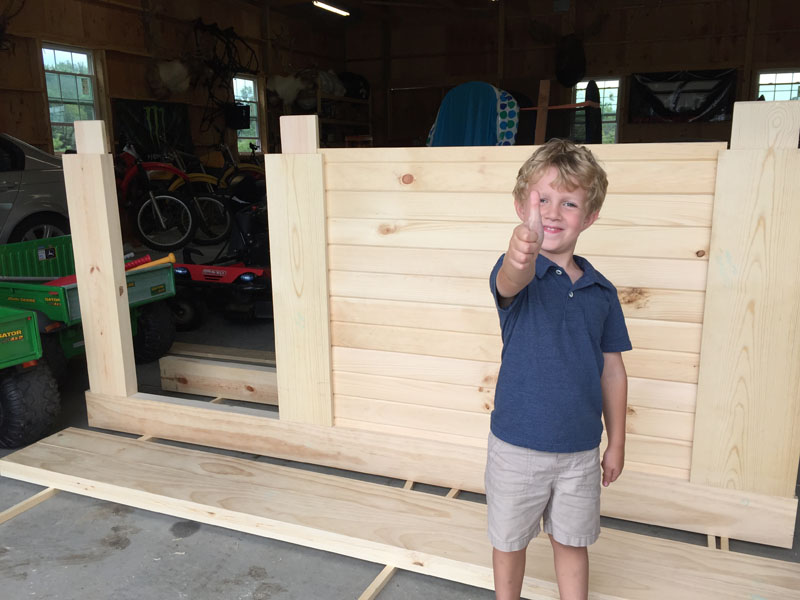
And here they are with all the kinks worked out.
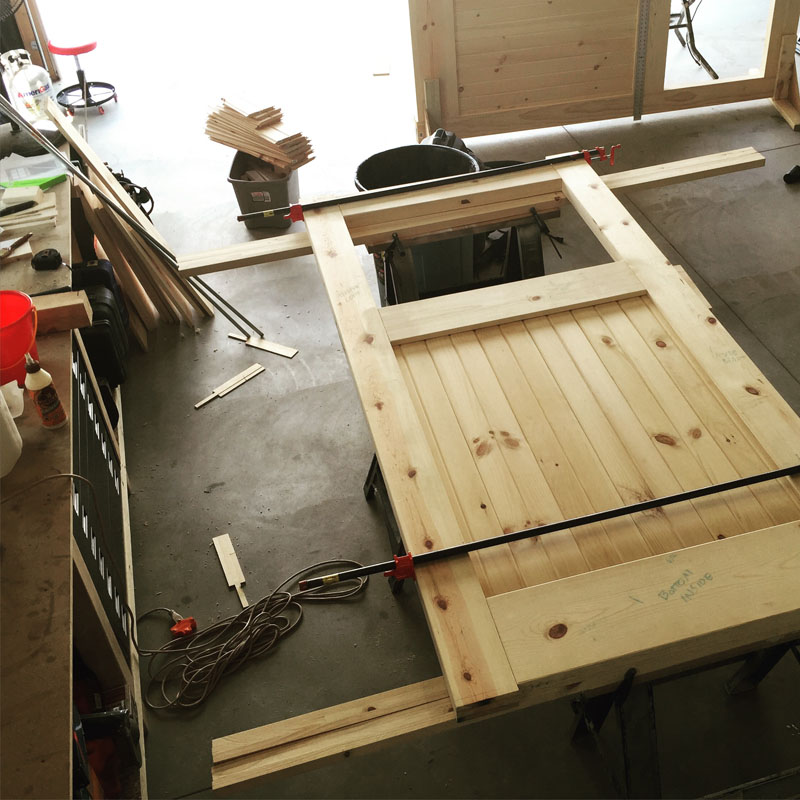
Gluing up was a challenge due to the large size of each door. Two pipe clamps kept everything tight. I was sure to take diagonal measurements to ensure they dried as square as possible. I ended up with less than a 16th difference over ~105″.
After the glue dried, I trimmed the excess off the top and bottom of the stiles. Just for kicks, I put them on a scale. About 90 lbs each – without glass or hardware. This was a happy day! :rocker:
Next I used a router to route a recess for the window glass to sit in.
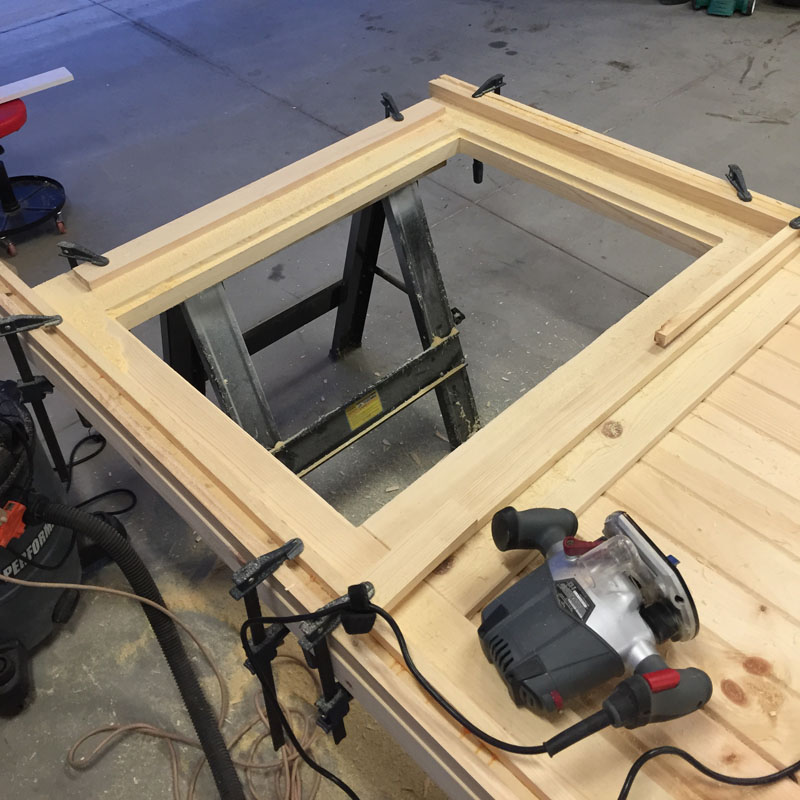
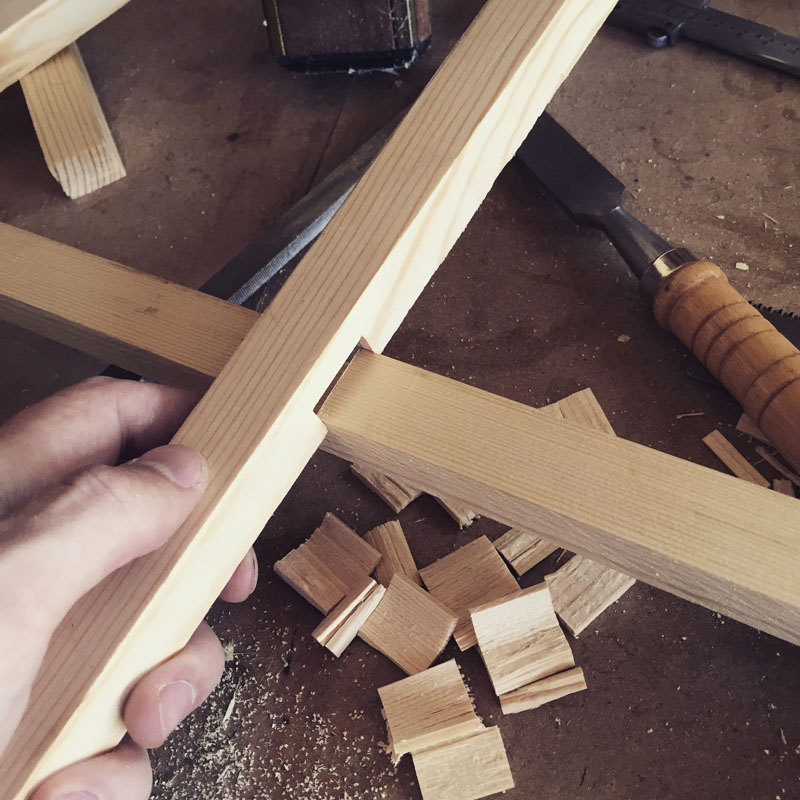
At this point, I ordered tempered glass to size from a local glass shop, as well as heavy duty 5×5 NRP stainless ball bearing hinges. Then I got to work on building the muntins using half lap joints.
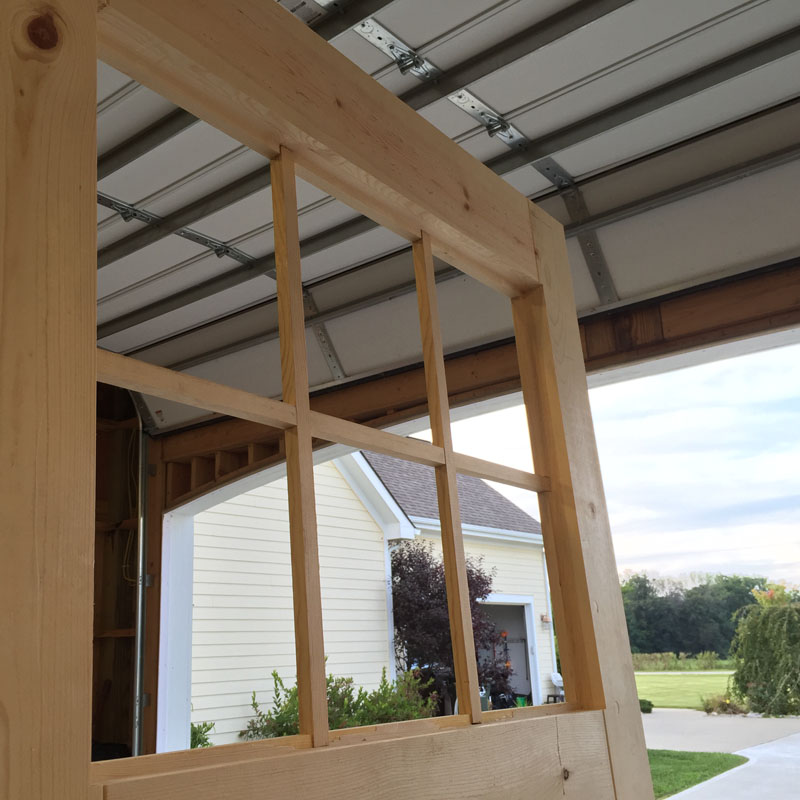
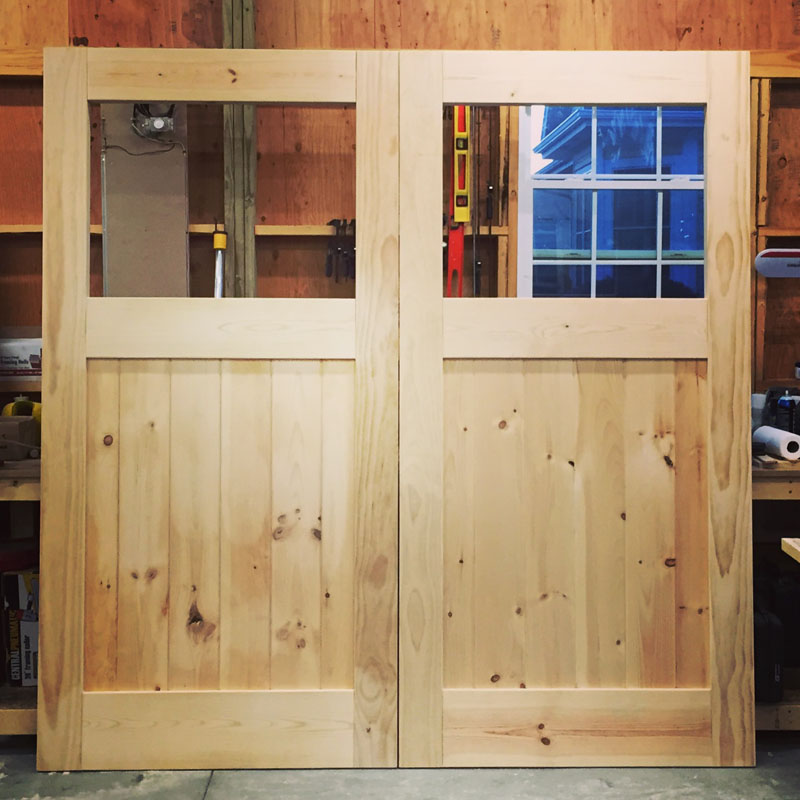
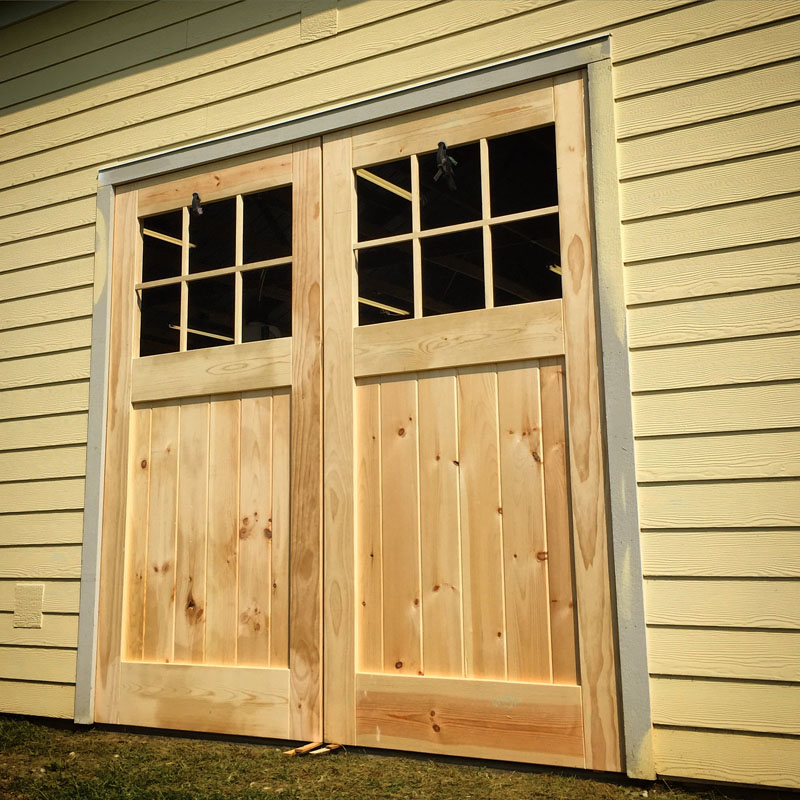
Meanwhile, I couldn’t resist test fitting them in place. This gave me time to work on finishing the jams. I had roughed the side and head jambs in before taking measurements for the doors, but still needed to cut the stops. The gap between the doors is about 3/4″ at this point, which will house an astragal.
Now they were ready to be finished. I sanded everything with 60, then 100 grit on an orbital sander and blew it all off with the compressor.
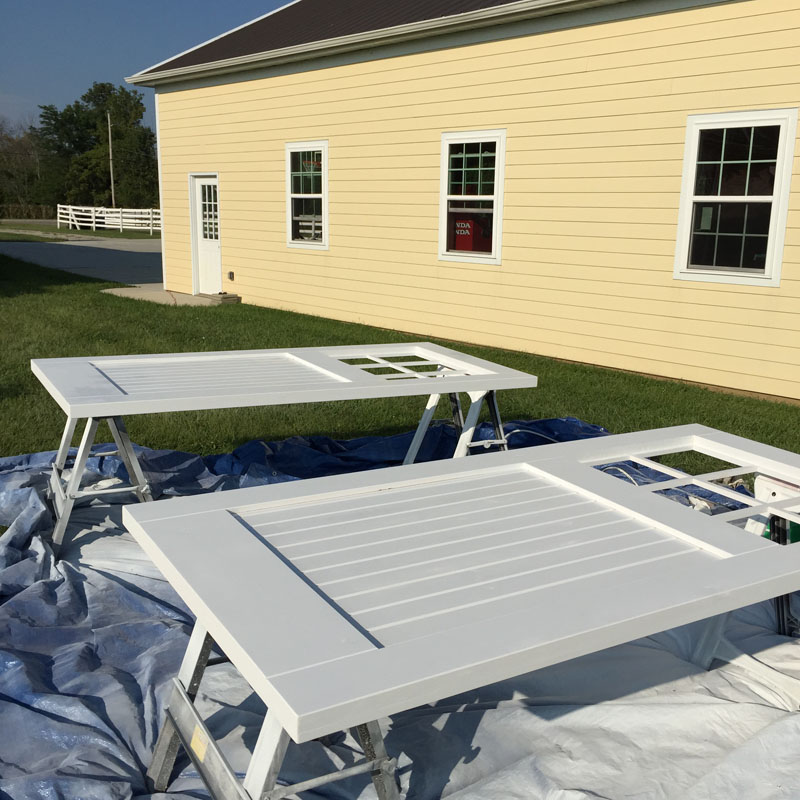
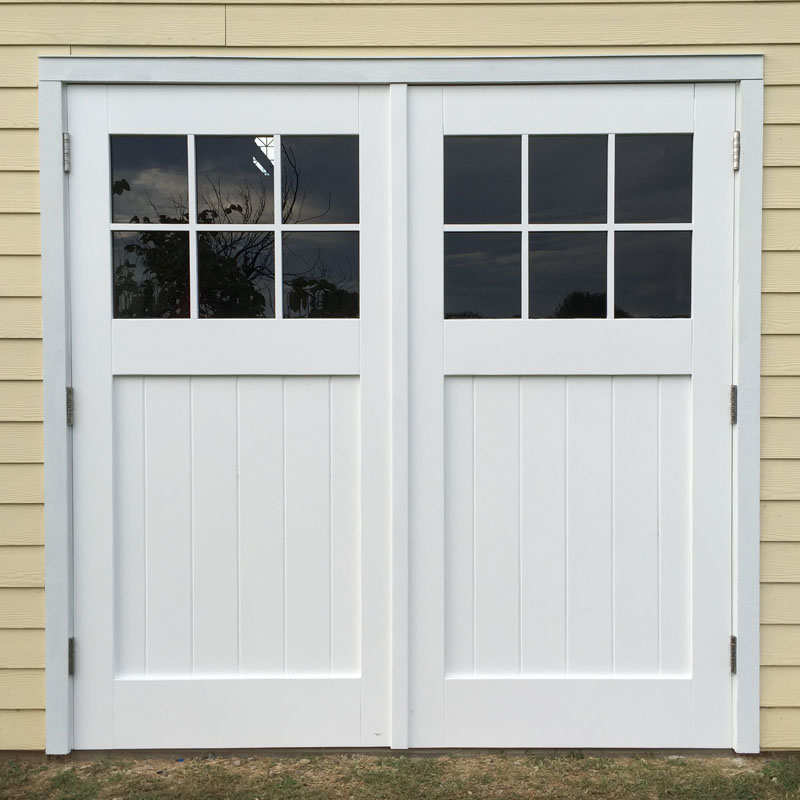
I had romanticized about how great a dark stain would look. In reality though, being that the doors had no protection from the elements, the fact they were pine, and my inexperience with stain and varnish, I decided to paint them. Hopefully, that should extend the life of the doors. My wife and I spent two days priming, then painting the doors with multiple coats using exterior semi-gloss latex.
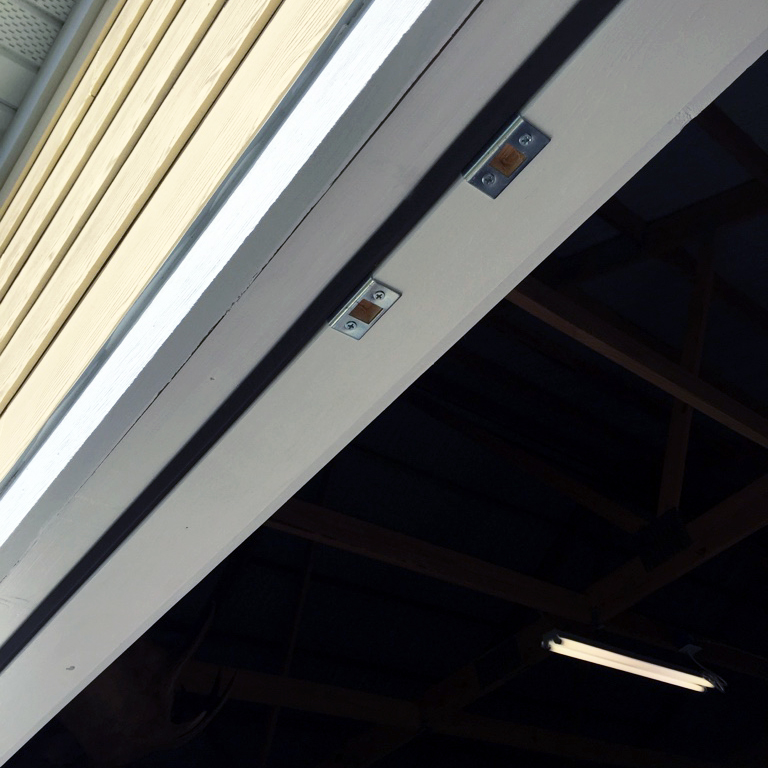
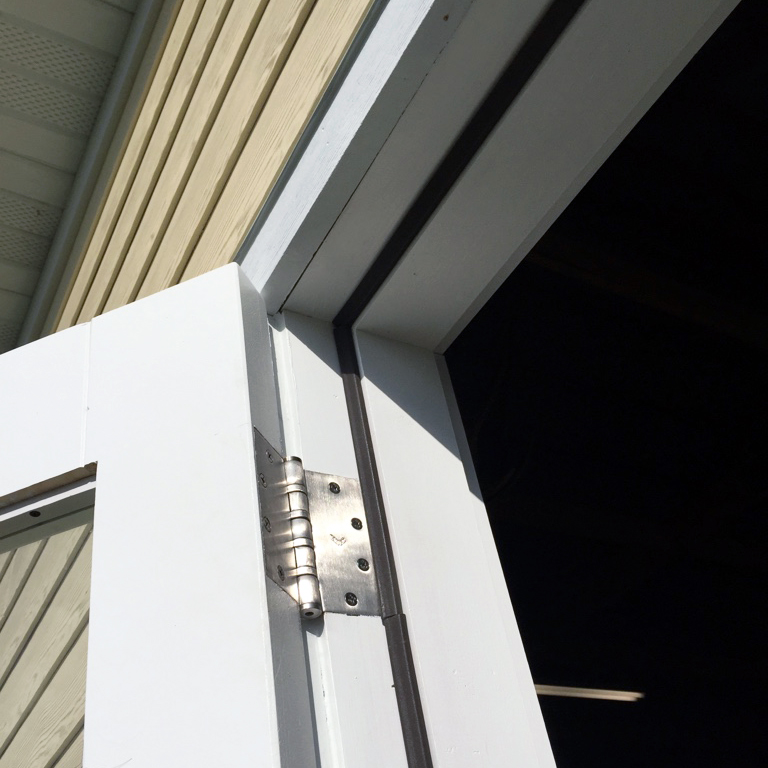
The glass came in, as did the hinges, later in the week, and I was on to routing the hinge mortises on the doors and jambs. A note on the hinges – I searched all over for hinges after deciding against standard barn/strap hinges. My reasoning behind deciding against strap hinges was that I felt they’d be more prone to sagging over time. The hinges I got were direct from Boston Architectural Hinge Company, who were very helpful in offering a reasonable price compared to other options online. I really can’t recommend them enough.
Anyhow, with some help, the doors were hung using 3″ stainless screws. Jamb stops and weatherstripping were installed. An astragal was built, the jambs were painted and hardware was installed – cane bolts on the bottom and chain bolts on the top.
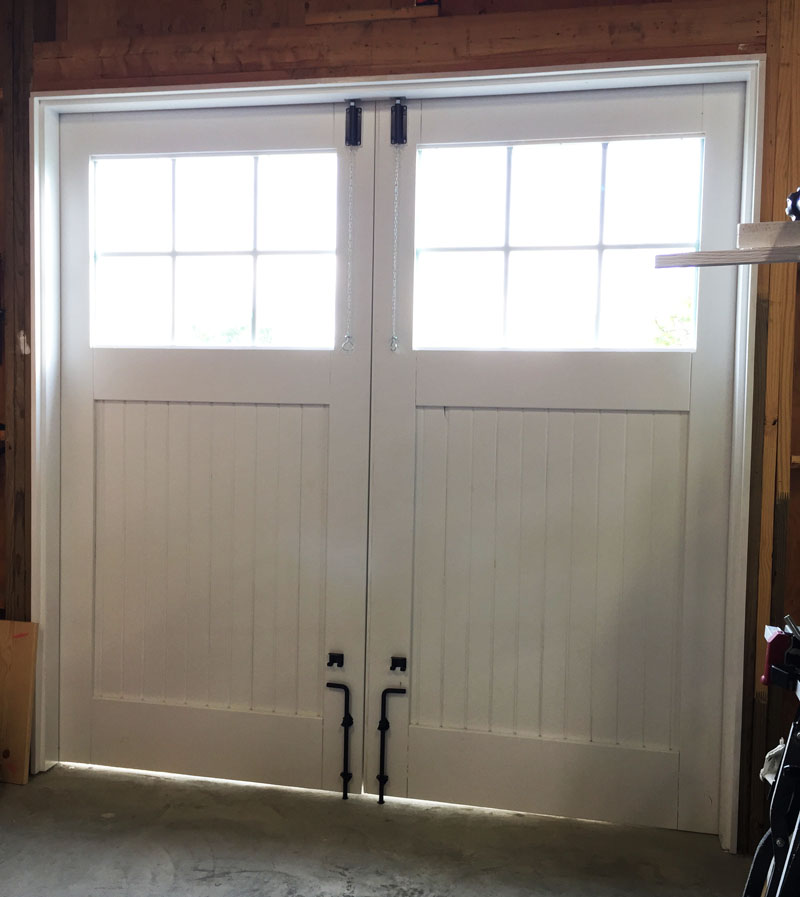
(the floor fell about an inch from the right to left side of this photo, but the framing was perfectly square)
Overall, the budget looked something like this:
Wood and glue: ~$200
Glass: ~$100
Paint: ~$100
Hinges: ~$100
Weatherstripping and jamb wood: ~$25
Cain and chain bolts: ~$50
In the end, it did cost more than an overhead door, but I got to learn a lot in the process and got the look I desired.
Here are some of the great resources I found online when considering how to do this:
http://www.kudzupatch.com/woodshop/gdoors/
http://www.garagejournal.com/forum/showthread.php?t=92642
http://www.garagejournal.com/forum/showthread.php?t=202586
http://www.ibuildit.ca/Woodworking%20Projects/door-1.html
http://www.finehomebuilding.com/item/21217/sneak-peek-building-the-carriage-doors-in-the-shop
http://www.finewoodworking.com/item/12151/building-an-interior-door-part-one-the-frame
http://www.idostuff.co.uk/sections/DIY/Door%20design%20and%20construction/Door%20Design.html
And of course, tons of inspiration can be found over at Real Carriage Doors.

This is awesome! Thank you very much for posting.
Been looking at these and I think I’m going to follow your plans and make the exact same doors this weekend (maybe slightly larger dimensions, but the same otherwise).
I noticed the slats on the front seem to be wider than the ones on the back. 5.5’s and 3.5s?
Did you notch the inner rail and stile and route the 3.5s to add additioanl thinckness to the panel?
Just wondering how you did that.
Again, Awesome Job! Two thumbs up! 😉
Thanks Kevin! I used reversible carsiding (link here) that had a #116 pattern on one side, and WP-4 pattern on the other – that’s why they looked different on each side. I suppose I could have matched the pattern on both sides with a router if I’d wanted. And you’re correct – the stiles and rails had a 3/4″ slot in which the carsiding fit, which I accounted for when building them. You can kind of see the slots in the picture with my son giving the thumbs up, as well as in the pic just above that one.
Beautiful job. I have been thinking about building a driveway gate in a similar manner . Thank you for posting this and all my best .
Jon
YOUR DOOR ARE WONDERFUL! !
COULD YOU CLARIFY ONE THING FOR ME? YOU STATED YOU LAMINATED 3, 4/4″ PINE BOARDS FOR THE DOOR AND THAT GAVE YOU 2 1/4″ THICKNESS BEFORE SANDING. DID YOU BUY 3/4″ THICK PINE BOARDS OR 1″ THICK BOARDS?
I HOPE TO BUILD THE DOORS AND HAVE THEM TURN OUT AS NICE AS YOURS
Sorry – to clarify, I used 1″ thick nominal, 3/4″ thick actual boards. Good catch! I’ll update the post.
Christian, awesome doors. I too will likely make these exact doors for my 8×8 opening in my garage.
A few questions –
how did you finish the inside of the windows? Add more slats on the inside? Just add retainers on the edges. I am not a carpenter so not sure of the correct verbiage.
what did you use for glue? liquid nail or simple wood glue.
how did you attach the astragal?
these doors went up in 2015. how are they holding up? anything that could have been done differently in hindsight.
thanks for sharing. glenn
Glenn, the inside of the windows were finished with retainers on the top and bottom. Honestly, that part is the least polished part of the build. I used Titebond Premium glue. The astragal was just nailed into place with galvanized nails, which were painted over. The doors are still doing just fine. Very minimal sagging. The big thing to have done differently would be to use clear wood. The carsiding used for the center panels had some knots, which have stained through the paint. It’s nothing another coat of paint won’t fix, but could have been avoided all together.
Hi. Thanks for the details. Do you know how much each door weighted? I need to build 2 sets of similar doors, but also 2 that are 7×14, and a little worried about the weight of those big ones.
They are about 90lbs each. Maybe a bit more with glass installed.
Galen. How did your 7×14 door build go? I need to build two 6×13.5 doors for RV Garage. Planning to use 2 inch stainless steel piano hinges. Trying to decide on wood, pine, cypress, cedar.
Great looking doors. I am planning on using this idea to make my own and was wondering what you used to cut the “mortise and tenons” with. Just use a jigsaw? Thanks
Yep – just a jigsaw worked fine.
Hi Cmoist,
Thank you again for posting your work. This is exactly what I am looking for. I really appreciate your time for sharing this project. I hae a question regarding the hinges. How was you able to purchase the hinges directly from Boston Architectural? I called them and they redirect me to absupply.
Thank you,
Tom
Also, are you using the 4 1/2″ x 4 1/2″ hinges or 5″ x 4 1/2″?
Thank you,
Tom
Tom – the hinges were 5×5. BAHCO part number BB0191-NRP-32D. They also told me they don’t typically sell to the public, but in the end, did.
This page is super helpful. I have to build two sets of 8×4.5 doors which I will do like you have, but with some additional diagonal bracing. And I also have to build two 14×6.5 doors. It’s probably difficult for you to say, but do you think the same dimensions of materials would be sufficient on the bigger 14×6.5 doors? I am thinking of making all of the border frame boards a bit wider, probably in Douglas Fir. Thanks.
Do you recommend gluing the carsiding has a panel before install? Your instructions are amazing. My doors look like yours.
Probably not. I prefer to let them float.
Where did you buy the chain bolts shown? I can only find bolts for in-swinging doors.
(Great design / plans, BTW.)
Both the cane and chain bolts were from Menards. I painted the chain bolt brackets, if I remember correctly.
Chain bolt – https://www.menards.com/main/hardware/door-window-hardware/security-entry-door-hardware/national-hardware-reg-zinc-chain-bolt/n150-771/p-1444441553442-c-7581.htm?tid=6836111223816807550&ipos=1
Cain bolt – https://www.menards.com/main/hardware/door-window-hardware/security-entry-door-hardware/national-hardware-reg-black-cane-bolt/n177-188/p-1444448906070-c-7581.htm?tid=-5478921579349219390&ipos=3
If you wanted to be able to open these doors from the outside, what hardware would you recommend?
Hmm. You have a couple of options. You could use the chain/cane bolts on one door, and it would only be able to be opened from the inside. The other one could act as a regular door, where cane/chain bolts aren’t used, and instead you use a standard door knob that would latch into the other door. Maybe a set like this (https://www.amazon.com/Kwikset-98180-001-Clemente-Handleset-Featuring/dp/B06Y39SK61/ref=asc_df_B06Y39SK61/?tag=hyprod-20&linkCode=df0&hvadid=216491680482&hvpos=1o5&hvnetw=g&hvrand=3896714118235657509&hvpone=&hvptwo=&hvqmt=&hvdev=c&hvdvcmdl=&hvlocint=&hvlocphy=9015781&hvtargid=pla-349751349042&psc=1).
The other option would be to use an automatic opener. Something like this (http://www.carriagedooropeners.com/).
What did you do for weatherstripping to seal the bottom of the door?
Unfortunately nothing yet. I bought some metal strips a while ago but haven’t attached them. I think a better solution would be a strip brush (https://www.grainger.com/category/material-handling/transporting/conveyors-components/conveyor-brushes/strip-brushes-mounting-holders).
Thank you so much for posting this. I am doing similar doors from my old one car garage. The issue is I wont to make them weather tight. Sides and top are easy but the threshold is where the problem comes about. Did you put something to keep dust and bugs out from the bottom portion of the door? I have looked around but can not find a good solution for the problem, then be able to drive my car over it now and then.
Have a look at strip brushes, like on Grainger here – https://www.grainger.com/category/material-handling/transporting/conveyors-components/conveyor-brushes/strip-brushes-mounting-holders
[…] used Christian’s (www.cmoist.com/…) design as a starting point for my carriage style garage doors. I used a header mounted track […]
So the drawings show that the doors are 94″ tall, but the specifics for each of the mortises and cutouts adds up to 96″ am I missing something here? I assume you don’t want the door to be the full 96″ since you need to frame out the door jamb, but where did you get the extra 2 niches? I was thinking of doing them with the carsiding section cut down to 47″
You’re right! I didn’t notice that, and had to go measure them. The error is that the carsiding section is indeed 47″, not 49″.
I adapted your technique to my design for a pair of 6′-6″ x 9′-2″ carriage house doors. They were fast and easy to construct, and came out incredibly stiff and strong. The 2 1/4″ thickness suits the doors’ scale very well. Thank you for sharing your project, and for the great step by step photos and instruction!
Hi, I am wondering if you made plans for an insulated door even though you decided against it in the end. I am trying to build insulated doors and your instructs, dimensions, drawing, and feedback is by far the most thorough I have found. Perhaps you have ideas on including a polyiso foam core?
I am planning on 2×6 framing so the extra thickness would not be an issue, I think.
Thank you!
Chad – I didn’t. I think if you were to make any sort of insulated doors using plans similar to these, it would consist of a sandwiched core in the center instead of using the carsiding. Like you mentioned, pink poly foam insulation would be the way to go. Perhaps that gets sandwiched between a couple layers of 1/4″ sheathing. Good luck!
Thank you!
Awesome, thank you for taking the time to share
This is a great article. I’ve read and reread it over the past couple of years as I’ve been planning my work shop. Finally got to start the project today and really looking forward to seeing how well I can follow instructions. For those curious, price of lumber has obviously gone up since the original post. My doors are ~ 8×3 each. Going with clear pine from HD here in Phoenix the total cost was about $700. That’s clear pine for the inside and outside face, common board for the middle lumber. I went with sanded 3/4 ply for the bottom face, going to lay an inset diagonal sash across each door.
Many thanks for the tutorial. I’ll be glued to this page for the next several days. Happy Thanksgiving!
Thanks Rob. Yeah, Id imagine prices have gone up. I did notice the other day at Home Depot, they had hinges similar to mine for a lot less. I think they were 5×5, but were ball bearing hinges. Might be worth a look. The only other advice Id give at this point is to ensure you seal/caulk all the top edges of the rails to avoid water getting in behind them and causing rot of the pine. Good luck!
Did you use pressure treated wood? I am planning on doing some doors and I am debating if I should use pressure treated or not.
Jonah, I did not, though if you can get pressure treated in the needed dimensions, I would recommend it.
hi – no mention of the center of the doors? how did you get the wainscotting?
I used reversible carsiding (https://www.menards.com/main/building-materials/siding/wood-siding/1-x-8-x-6-tongue-and-groove-carsiding/p-1444443101690-c-13151.htm) that had a #116 pattern on one side, and WP-4 pattern on the other
Super nice . if I tried to make a wooden driveway gate would I have to used pressure treated wood or lap the wood ( maybe cedar ) to make each side of the gate. Any ideas would be appreciated or if you could steer me to a site that my know . Your work is wonderful. I love how tight and well made it looks .
Thank you,
Jon
Jon – the only advise I’d have for a driveway gate would be that it will need some reinforcement, given it’s probably a lot wider than the 4ft doors I made. You’d probably need to incorporate some sort of diagonal bracing or strapping. Good luck!
These are beautiful. Simple yet elegant. Was your jamb built and placed beforehand and the door was built to fit what opening remained or where they built together as a unit? And is the center piece free floating to allow for movement? BTW, I also like the chamfer you did where the rails and stiles meet. For some reason, that looks much better than having them seamlessly joined
The jambs were considered when building the doors. I think I built them all together, knowing I had to add 3/4″ on each side for the jambs. The center was free floating, yes.
Hi Christian,
Thanks for putting this together. I love the idea of being able to pre-build the mortise and tenon’s.
Curious, how are the doors holding up?
The pine started to rot after about 7-8 years in some spots. For that reason, I started looking at an overheard door to replace them, which I’ve installed. This was actually longer than I originally expected them to last, given the materials. I did saw them up before taking them away. They could have certainly gone for a another few years. Still no sagging, just some rot on the outside of the stiles near the base. My recommendation would be to use a hardwood if you’re going to build a set for yourself.
These look great! I’m going to use this as a template for mine. I was wondering if you had any detail on the T Astragal that you made?
Richard, if I remember correctly, I used two pieces of wood in a T-shape. I didn’t create the astragal out of one solid piece.
Thanks so much for sharing your door design! I’m making a pair of these doors scaled down for my workshop. I’m using pine but to help resist rotting I’m applying shellac to the pine before painting making sure to apply more to the end grain. As for your rot that has started to appear, you could scrape out the rot and then apply a wood hardener. After which I apply Bondo All-Purpose-Putty that when dried can be sculpted via sanding and then painted. I did just this for my rotting window sills. They looked great and saved me $10k in new windows 🙂
Could be an easy and cheaper fix for your doors.
For the inside glass window trim, I’m thinking of just adding some trim molding that can be removed for future window replacement if needed.
Thanks again, Randy